DetailsView control used to display a single database record of table layout in ASP.Net. Means it works with a single data item at a time. DetailsView control used to display record, insert, update, and delete records from database.
DetailsView Control Syntax :
<asp:DetailsView ID=“DetailsView1“ runat=“server“></asp:DetailsView>
Here, we will learn how to use DetailsView control in ASP.Net with C#.
DetailsView Example in ASP.Net C#
Now let’s take an asp.net example to bind data to DetailsView.
Here, we learn how to bind and display data in DetailsView control from sql server database in asp.net c#.
DetailsView Control Example in ASP.Net C#
Step 1 – Open the Visual Studio –> Create a new empty Web application.
Step 2 – Create a New web page.
Step 3 – Drag and drop DetailsView Control on web page from toolbox.
Step 4 – Create New Database in SQL Server
Step 5 – Make connection between Database and web application.
Step 6 – Bind and Display data to DetailsView.
<table>
<tr>
<td align="right">
Name :</td>
<td>
<asp:TextBox ID="txtname" runat="server"></asp:TextBox>
</td>
</tr>
<tr>
<td align="right">
City :</td>
<td>
<asp:TextBox ID="txtcity" runat="server"></asp:TextBox>
</td>
</tr>
<tr>
<td>
</td>
<td>
<asp:Button ID="btnSave" runat="server" onclick="btnSave_Click" Text="SAVE" />
</td>
</tr>
<tr>
<td>
</td>
<td>
<asp:DetailsView ID="DetailsView1" runat="server"
BackColor="LightGoldenrodYellow" BorderColor="Tan" BorderWidth="1px"
CellPadding="2" DataKeyNames="ID" ForeColor="Black" GridLines="None"
Height="50px" onitemdeleting="DetailsView1_ItemDeleting"
onitemupdating="DetailsView1_ItemUpdating"
onmodechanging="DetailsView1_ModeChanging"
onpageindexchanging="DetailsView1_PageIndexChanging" Width="125px">
<FooterStyle BackColor="Tan" />
<PagerStyle BackColor="PaleGoldenrod" ForeColor="DarkSlateBlue"
HorizontalAlign="Center" />
<HeaderStyle BackColor="Tan" Font-Bold="True" />
<EditRowStyle BackColor="DarkSlateBlue" ForeColor="GhostWhite" />
<AlternatingRowStyle BackColor="PaleGoldenrod" />
</asp:DetailsView>
</td>
</tr>
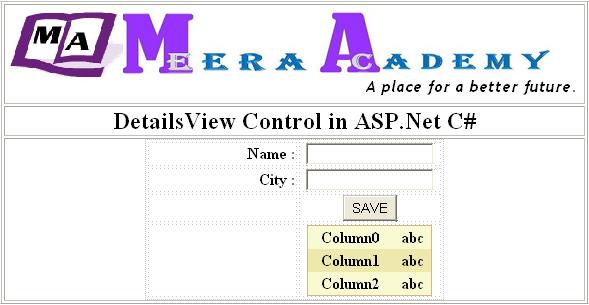
</table>ASP.Net DetailsView control example design output is:
Now, After doing this next step to bind the DetailsView control from Database.
Here, we first insert record in to database and fetch record from database and display it to DetailsView control in ASP.Net.
write below code on SAVE button for insert and bind data to DetailsView in ASP.net.
protected void btnSave_Click(object sender, EventArgs e)
{
SqlConnection SQLConn = new SqlConnection("Data Source=COMPUTER_1\\SQLEXPRESS;Initial Catalog=BOOK;Integrated Security=True");
SqlDataAdapter SQLAdapter = new SqlDataAdapter("insert into UserMst values ('"+ txtname.Text +"','"+ txtcity.Text +"')", SQLConn);
DataTable DT = new DataTable();
SQLAdapter.Fill(DT);
BindDetailsView();
}
private void BindDetailsView()
{
SqlConnection SQLConn = new SqlConnection("Data Source=COMPUTER_1\\SQLEXPRESS;Initial Catalog=BOOK;Integrated Security=True");
SqlDataAdapter SQLAdapter = new SqlDataAdapter("select * from UserMst", SQLConn);
DataTable DT = new DataTable();
SQLAdapter.Fill(DT);
DetailsView1.DataSource = DT;
DetailsView1.DataBind();
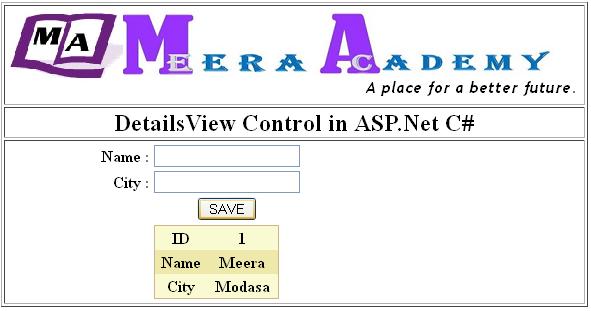
}The Out put of DetailsView control example is
If you use DetailsView control in your website, then it can display a single record at a time, so you must have do paging with DetailsView control for show all the records one by one.
Related ASP.Net Topics :
FileUpload Control
Paging in DetailsView control
Subscribe us
If you liked this asp.net post, then please subscribe to our YouTube Channel for more asp.net video tutorials.
We hope that this asp.net tutorial helped you to understand about DetailsView control.
I’m so happy .Tq meera academy
Thank you…