Panel control is a container of other control. We can place multiple web server control in Panel control and make same effect or action on all controlby applying effect of Panel Control.
Exmaple: if we want to Hide or visible more then one Control as same time, so we can place them to in Panle control and Just Visible or Hide Panle control the all the control will be Visible or Hide according to Panel Control.
Panel Control is a Container of web server control in ASP.Net.
Here, we understand Panel Control by tacking an Example in ASP.Net C#.
We tack an Example of Registration form for any website. Simple Registration Form has many part like Personal Detail, Address Detail, Login Detail. We first Fill up the Personal Detail and Click Next to Address Detail and Finally Login Detail.
The Panel Control is automatically exhaust the Space of web form.
First we design the Registration form in ASP.Net like:
<table style=”z-index: 100; left: 232px; width: 488px; position: absolute; top: 64px”>
<tr>
<td style=”width: 100px; height: 35px; text-align: left;”>
<strong><span style=”font-size: 18pt; color: #0000cc”>Panel Control Example in ASP.Net
C#</span></strong></td>
</tr>
<tr>
<td style=”width: 100px”>
<asp:Panel ID=”Panel1″ runat=”server”>
<asp:Panel ID=”Panel2″ runat=”server”>
<table style=”border-right: maroon thin solid; border-top: maroon thin solid; border-left: maroon thin solid;
border-bottom: maroon thin solid”>
<tr>
<td colspan=”2″ style=”text-align: center; border-bottom: maroon thin solid”>
<span style=”font-size: 16pt”>Personal Detail :</span></td>
</tr>
<tr>
<td style=”width: 100px; text-align: right;”>
Name :</td>
<td style=”width: 100px”>
<asp:TextBox ID=”TextBox1″ runat=”server”></asp:TextBox></td>
</tr>
<tr>
<td style=”width: 100px; text-align: right;”>
SureName :</td>
<td style=”width: 100px”>
<asp:TextBox ID=”TextBox2″ runat=”server”></asp:TextBox></td>
</tr>
<tr>
<td style=”width: 100px; text-align: right;”>
Gender :</td>
<td style=”width: 100px”>
<asp:TextBox ID=”TextBox3″ runat=”server”></asp:TextBox></td>
</tr>
<tr>
<td style=”width: 100px; text-align: right;”>
Mobile :</td>
<td style=”width: 100px”>
<asp:TextBox ID=”TextBox4″ runat=”server”></asp:TextBox></td>
</tr>
<tr>
<td style=”width: 100px; height: 26px”>
</td>
<td style=”width: 100px; height: 26px”>
<asp:Button ID=”Button1″ runat=”server” Text=”Next” Width=”72px” OnClick=”Button1_Click” /></td>
</tr>
</table>
</asp:Panel>
<asp:Panel ID=”Panel3″ runat=”server” Visible=”False”>
<table style=”border-right: maroon thin solid; border-top: maroon thin solid; border-left: maroon thin solid;
border-bottom: maroon thin solid”>
<tr>
<td colspan=”2″ style=”text-align: center; border-bottom: maroon thin solid”>
<strong><span style=”font-size: 16pt”>Address Detail :</span></strong></td>
</tr>
<tr>
<td style=”width: 100px; text-align: right;”>
Address :</td>
<td style=”width: 100px”>
<asp:TextBox ID=”TextBox5″ runat=”server”></asp:TextBox></td>
</tr>
<tr>
<td style=”width: 100px; text-align: right;”>
City :</td>
<td style=”width: 100px”>
<asp:TextBox ID=”TextBox6″ runat=”server”></asp:TextBox></td>
</tr>
<tr>
<td style=”width: 100px; text-align: right;”>
Pincode :</td>
<td style=”width: 100px”>
<asp:TextBox ID=”TextBox7″ runat=”server”></asp:TextBox></td>
</tr>
<tr>
<td style=”width: 100px”>
</td>
<td style=”width: 100px”>
<asp:Button ID=”Button2″ runat=”server” Text=”Back” Width=”56px” OnClick=”Button2_Click” />
<asp:Button ID=”Button3″ runat=”server” Text=”Next” Width=”56px” OnClick=”Button3_Click” /></td>
</tr>
</table>
</asp:Panel>
<asp:Panel ID=”Panel4″ runat=”server” Visible=”False”>
<table style=”border-right: maroon thin solid; border-top: maroon thin solid; border-left: maroon thin solid;
border-bottom: maroon thin solid”>
<tr>
<td colspan=”2″ style=”text-align: center; border-bottom: maroon thin solid”>
<strong><span style=”font-size: 16pt”>Login Area :</span></strong></td>
</tr>
<tr>
<td style=”width: 100px; text-align: right;”>
UserName :</td>
<td style=”width: 100px”>
<asp:TextBox ID=”TextBox8″ runat=”server”></asp:TextBox></td>
</tr>
<tr>
<td style=”width: 100px; text-align: right;”>
Password :</td>
<td style=”width: 100px”>
<asp:TextBox ID=”TextBox9″ runat=”server” TextMode=”Password”></asp:TextBox></td>
</tr>
<tr>
<td style=”width: 100px; height: 21px”>
</td>
<td style=”width: 100px; height: 21px”>
<asp:Button ID=”Button4″ runat=”server” Text=”Back” Width=”56px” OnClick=”Button4_Click” />
<asp:Button ID=”Button5″ runat=”server” Text=”Submit” /></td>
</tr>
<tr>
<td style=”width: 100px”>
</td>
<td style=”width: 100px”>
</td>
</tr>
</table>
</asp:Panel>
</asp:Panel>
</td>
</tr>
<tr>
<td style=”width: 100px”>
</td>
</tr>
</table>
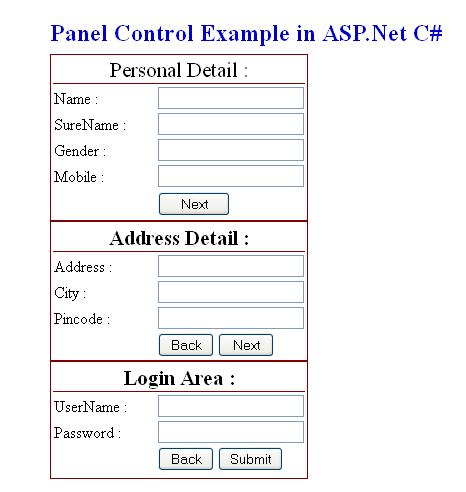
The ASP.Net Panel Control output is like :
Here, we have Three Panel Control on asp.net web form. Here what we are going to do, just visible and Hide panel control according to the button click event.

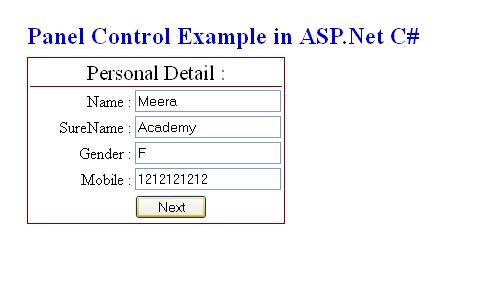
Now when we run the website we need to display only one portion of Personal Detail at a time like:
After filling personal detail click the NEXT Button to fill Address Detail.

Write the below code on NEXT Button of Personal Panel Click Events:
protected void Button1_Click(object sender, EventArgs e)
{
Panel2.Visible = false;
Panel3.Visible = true;
Panel4.Visible = false;
}
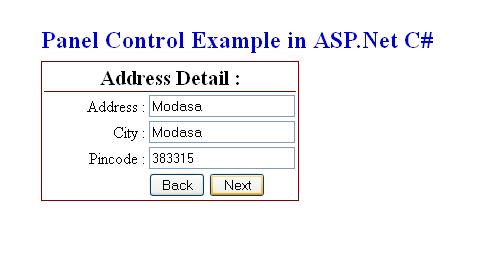
The ASP.Net Panel Control Address Detail output is:

Now, we are at Address Detail Form, Click next button to Login Panel control.
Write below code on NEXT Button of Address Detail Click Event in ASP.Net
protected void Button3_Click(object sender, EventArgs e)
{
Panel2.Visible = false;
Panel3.Visible = false;
Panel4.Visible = true;
}
Write the Below code on Back Button click event for go to Personal Detail from Address Detail.
protected void Button2_Click(object sender, EventArgs e)
{
Panel2.Visible = true;
Panel3.Visible = false;
Panel4.Visible = false;
}
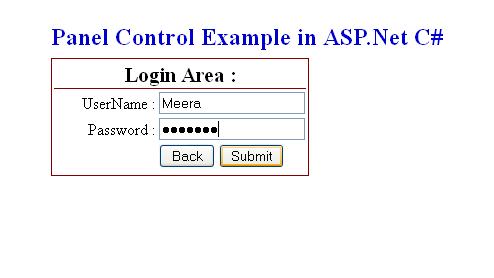
The output of ASP.Net Panel Control Login Area is:
Write below code on Back Button to go to back on Address Detail from Login Panle.
protected void Button4_Click(object sender, EventArgs e)
{
Panel2.Visible = false;
Panel3.Visible = true;
Panel4.Visible = false;
}
I hope you will enjoy this asp.net panel example……
