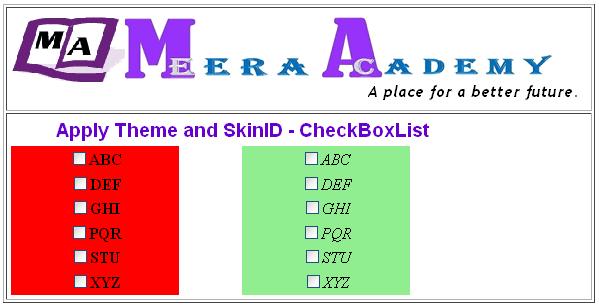
Here, In this ASP.Net tutorials we are going to learn how to use theme and skinID on CheckBoxList Control in ASP.NET with C#.
STEP 1 – Design the ASP.Net web page with Two CheckBoxList Control :
<table style=”width: 464px”>
<tr>
<td colspan=”2″ style=”height: 24px”>
<strong><span style=”font-size: 14pt; color: #6600cc; font-family: Arial”> Apply
Theme and SkinID – CheckBoxList</span></strong></td>
</tr>
<tr>
<td style=”width: 257px; height: 22px; text-align: center;”>
<asp:CheckBoxList SkinID=”Red” ID=”CheckBoxList1″ runat=”server”>
<asp:ListItem Value=”1″>ABC</asp:ListItem>
<asp:ListItem Value=”2″>DEF</asp:ListItem>
<asp:ListItem Value=”3″>GHI</asp:ListItem>
<asp:ListItem Value=”4″>PQR</asp:ListItem>
<asp:ListItem Value=”5″>STU</asp:ListItem>
<asp:ListItem Value=”6″>XYZ</asp:ListItem>
</asp:CheckBoxList></td>
<td style=”width: 257px; height: 22px; text-align: center”>
<asp:CheckBoxList ID=”CheckBoxList2″ SkinID=”Green” runat=”server”>
<asp:ListItem Value=”1″>ABC</asp:ListItem>
<asp:ListItem Value=”2″>DEF</asp:ListItem>
<asp:ListItem Value=”3″>GHI</asp:ListItem>
<asp:ListItem Value=”4″>PQR</asp:ListItem>
<asp:ListItem Value=”5″>STU</asp:ListItem>
<asp:ListItem Value=”6″>XYZ</asp:ListItem>
</asp:CheckBoxList></td>
</tr>
</table>
STEP 2 – Create SkinFile in Theme1 Folder and write below code in SkinFile:
<asp:CheckBoxList runat=”server” SkinID=”Red” Width=”168px” BackColor=”Red” Font-Bold=”True”></asp:CheckBoxList>
<asp:CheckBoxList runat=”server” SkinID=”Green” Width=”168px” BackColor=”LightGreen” Font-Italic=”true”></asp:CheckBoxList>
STEP 3 – Apply Theme to ASP.Net webpage:
<%@ Page Language=”C#” AutoEventWireup=”true” CodeFile=”ClistThemeSkinID.aspx.cs” Inherits=”chkbox_Clistskonid” Theme=”Theme1″ %>
The ASP.Net CheckBoxList Theme and SkinID Example output is:

– I hope this ASP.Net Example of CheckBoxList SkinID will help you………..